Showing posts with label smoky eye. Show all posts

Saturday, January 28, 2017

A Hint of Green Makeup Session, 2016


It's after noon on Monday, January 2, and I'm attempting to be productive on my day off. 

It's now nearly noon on January 28, and I just realized I never share this blog post, which has been ready for weeks now. So here goes..

This makeup session was from several weeks back, and it turned out so beautiful that I had to get it up and share it with y'all. 

Of course, I'm still behind on a lot of my summer sessions. I was so busy during wedding season that I got so behind. And now I'm reaping the consequences in trying to play "catch-up." 

I can only hope that I'll be able to get everything up before the 2017 wedding season begins. 

Anyways, let's get the ball rolling with this post. 

Brittany was one of the few clients who didn't have an idea on what she was looking for and gave me free reign. I like getting to use my creative abilities and do things outside the norm. It seems like more times than not clients have an idea on what they'd like, and a lot of the makeup ends up looking very similar. 

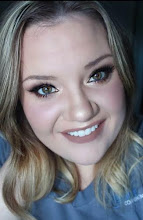
I used the Makeup Geek Duochrome Eyeshadow in "Ritzy" ($6) on her lid and blended it out with some smoky taupe browns. 

This was probably one of my favorite fall makeup looks of 2016, because it is different and it really made her natural features shine.

I chose to smoke out her lower lash line and water line to make her eyes glow. And to add some flared wispie lashes for a more dramatic effect.


We pulled the rest of the look together with the Laura Geller Blush-n-Brighten in "Pink Grapefruit," which is one of my all time favorite blushes. It is a rich orange-mauve blush with some shimmer. I believe you can get it at Ulta for $28. 

As always, I applied highlighter all over the high points (above her cheekbones, her cupid's bow and even the tip of her nose) for a soft glow. 

And last but not least, a deep burgundy lip shade which is the definition of fall. Personally, I'd just about wear wine lips year round, though.  


I'd love to hear what you think about this look, and what your definition of fall makeup is! 

Until next time.. 
xx- Whitney 

Thursday, September 10, 2015

Versatile Black Smoky Eye feat. Kat Von D Shade + Light Eye Contour Palette

Since posting this look last week on my various social media outlets, I've had quite a bit of interest on how I created it! I LOVE sharing my work and giving tips and how-to's for those of you with an avid interest in learning more about makeup or recreating what I've come up with. 

I don't have photos for this particular look as I have for some of the others I've posted recently, because I attempted to video myself doing this look and it didn't turn out as well as I'd hoped. For now, I'm going to stick to the photos, but I am trying to learn how to edit and produce better quality videos with my DSLR camera. 
Below, I've posted a photo of the Kat Von D Shade + Light Eye Contour Palette ($46) to show which shades I used for each step in this look. If you do not have this palette, you can use similar shades from other palettes you may have. Also, you can use shimmer shadows, but this particular palette is completely matte. I didn't choose to add any glitter or shimmer to my eyes. 
  1. I first set my eye primer with the cream shade marked as the "brow bone highlight" above. 
  2. I then used the creamsicle looking "transition shade" to carve out the entire crease and set a nice base above the crease, so when I used the darker shades it would be easier to blend and smooth out. 
  3. Next, I applied a coat of the Maybelline Eye Studio Color Tattoo in "Dramatic Black" ($6.99) just to my lid. You could also use a black eyeliner, a jumbo eye pencil, etc. I did this so that when I did apply the black shadow it would be much deeper and bolder on the lid. 
  4. The obvious next step is to take a flat shader brush (or your finger, since I find that I often get super intense pigmentation when I use my finger to pat it on) to pack the matte black shadow across my entire lid. 
    • Try not to apply the black much above the lid. We'll be blending the black out with lighter colors next, so keep the black strictly to the lid. 
  5. I then mixed the two "crease" shades above and started to blend those into the crease all across the eye. 
    • It takes a lot of patience when using a dark shade on the lid, so just keep blending and adding more of those shadows to your brush until the black and warm browns start to meld together and look smooth on your eye. 
    • Also, when blending these browns into the crease, try not to carry them up too close to your brow bone. You want that original pale orange shade to continue on as your transition shade, so the shadows all fade out closer to the brow you get.
  6. Then, I took a fluffy blending brush and reapplied that "transition shade" to that area right under the brow bone to further blend and accentuate that transition. 
  7. I also usually reapply the "brow bone highlight" shade to the area below my brows. By doing so, you're brightening up the upper area of the eye and it also helps to define your brows and enlarge your eyes. 
  8. Since this was a black smoky look, I didn't feel it necessary to use a liner up top. I used a black kohl pencil liner to line my waterline and tightline. 
  9. I also used the warmer brown "crease" shade on the right side of the palette with a small pencil brush to go across the whole bottom lash line. And topped that off with a thin line of the black shadow to smoke it out but add dimension. 
    • If you look at any of the open-eyed photos in this post, you can see the warm brown and black both on my bottom lash line. The brown shade just brings a little warmth back to the eyes. 
  10. I curled my lashes and applied a thin coat of mascara to them. Then, I applied the Salon Perfect 614 Black Strip Lash lashes. 
I also had a few people ask me about my lip combination for this look, which included the NYX Slim Lip Pencil "Nutmeg" ($3.50) and Gerard Cosmetics Lipstick in "Nude" ($19). I chose to do with a more neutral colored lip, which wouldn't take away from the smoky eye I created. 
And there you have it, folks! Let me know if you have any questions, suggestions for the future, or comments! 

I hope to do something fun next. Maybe with some wild colors involved?! I'm not sure yet, but I'm already excited to share it with you all! x