Showing posts with label beauty. Show all posts

Tuesday, December 20, 2016

Natasha Denona Star Palette: Is it Worth the Hype?


Good evening. 

I know it's been a hot minute since my last post, but I finally have a few days off work for the holidays, and now seems like as good a time as any to play catch-up.. I also realize I have still yet to upload the a lot of my work from the summer and fall. I WILL get around to this. 

But first and foremost, let's talk Natasha Denona, and this Star Palette that's been everywhere lately. 

I hugely debated buying it, but decided to because it was a tad cheaper than the $200+ her other larger palettes are. 
I LOVE makeup. You all know I love makeup. But I'm hard-pressed to pay over $200 bucks for a palette. I have tons of money invested in my makeup and brush collections, but that's a bit steep, even for me. 

However, I would like to point out that I did manage to score this for $135 during the VIB 20% off promo a couple months back.  

Upon arrival, I was very impressed with the packaging and size of the palette. While the price may be steep, you are getting a good amount of product. 

Also, a really cool feature in this palette is the clear sleeve with the shadow names on it. It is actually attached to the inside of the palette, so it won't slide around like most of the clear sleeves palettes come with. This also prevents any glittery or powdery fallout from getting the mirror side of the palette all dusty and dirty. 

Now, let's talk finishes. This palette includes four different shadow finishes: 
  • Crystal: Spectrum, Cosmo, Galaxia, Polaris
  • Creamy Matte: Earth, Flesh, Gemma, Titanium, Diadem, Vega, Phoenix, Electra, Atik
  • Metallic: Bellatrix, Atria, Rhea
  • Duo Chrome: Orion, Supernova 
Left to Right: Spectrum, Earth, Bellatrix,
                Flesh, Orion, Gemma,
              Atria, Titania, Cosmo
So, you can see that you get quite a variety. 

The crystal shadows, I have found, are VERY crumbly because they are pure pigment. I did my own research, then tested them myself, and found they are best applied with the finger. To prevent major fallout, it's best to tap it into your skin rather than rub over the lid. 

The mattes are creamy, but not as much so as Lorac shadows are (in my opinion. 

The metallic textures are probably my favorite. They aren't crumbly like the crystal shadows, can be wet with some Fix Plus to make them really POP, and are currently a very popular finish. 

The duo-chrome shadows are very standard. Pigment is decent, blendability is good, and the colors are pretty. 

I like the color range in the palette. The warm shades are right up my alley with my hazel eyes. 

However, one thing lacking from this palette is a good brow bone highlight shade. I basically can't live without one, so it's a nuisance to have to pull from another palette for a white shade. 
Left to Right: Diadem, Vega, Galaxia,
                               Phoenix, Supernova, Electra,
            Polaris, Atik, Rhea
Here, I have provided you some swatches. And as you can see, the shades are all decently pigmented. There isn't one that's dull. I think my main complaint is just that the textures themselves could be hard to work with if you didn't know either the right techniques or make an effort to play around with them a bit. 

I've seen multiple mixed reviews because some people just don't want to take the time to learn how to work with the product. 

Personally, I don't mind it. I like to get my fingers messy and play around, whether it be makeup or chalk pastels. It's the artist in me. 

However, I find it a little disconcerting that the price tag on these palettes is so high when the formula isn't absolutely, without a shadow of a doubt, the best thing we've ever seen. 

It gives me reservations on ever purchasing the $200+ palettes, because is it possible they'd be any better? Who knows! 

The verdict: Would I buy this again? Do I approve? Am I satisfied? Yada, yada, yada.. 

I won't rule it out. The only things I don't love about this palette are the lack of a highlight shade and that something so expensive isn't "effortless" to use. I'm going to give this product a B-. The grade is still passing, but not over the top. I don't regret buying it, and I look forward to coming up with some pretty looks using it. 

As always, thanks for tuning in for another one of my sporadic posts! 

xx, 
Whitney 

Saturday, November 19, 2016

I've Always Wanted to be Pink--And a Troll

Let me first preface by saying that as a child I LOVED Trolls. I'm sure I still have a few packed away in the playhouse at my parent's house. Hopefully I do; I'd like to give them to my children one day. 

The one Troll I remember playing with most had hot pink hair just like Poppy's. I always remembered thinking they were so cute with their bulbous noses and big eyes. And since a bulbous nose is something I am all too familiar with, and hot pink is my favorite color, I fashioned the idea to morph myself into Poppy. 

As you all know, the Trolls movie is in theaters now, so it's the perfect time for this post. 

I honestly had a lot of fun with this. It was something outside my norm, and I've been trying to learn as much as I can about FX and creative makeup. 

For this post, I'll be listing products I used and how I used them to create this look. Maybe after this you'll have an idea on how to create your own Poppy look.

Before we get into the makeup, I bought the headband with the signature troll hair for $3 at a store called Five Below. I looked on their site, and unfortunately, I don't see the headband on there. I wasn't even looking for Poppy gear. I like going into that store when I get a chance because it's one of those "plundering" stores where you never know what you might find-- and for five or less bucks at that. 

  1. Now, the first thing I did was apply primer. 
  2. Then, I mixed the peach + pink + white shades from the iMagic Flash Palette (an exact dupe of the $100 MUFE Flash Palette) to create the shade of pink I wanted. **I bought the cheaper version of the palette to learn how to use it before paying $100 for the real thing.** If I did this look over, I'd probably lighten the pink up even more than I did here. 
  3. I tried to conceal my brows a bit to lighten them up, which didn't help as good as I would have liked. I'd probably try something else next time.
  4. Next, I applied the pink mixture all over my face. And then set it with the MAC Good Luck Trolls Beauty Powder in "Play it Proper." I didn't mind the iridescence from the powder on my face (for once) because I wanted to have an all-over glow. 
  5. Then I took the pink shade in the flash palette and used it to draw on a shape for my brows. 
  6. For the darker pink face contour, hot pink cheeks, pink nose, pink eyeshadow and to set the brows, I used the vibrant pink City Colour Be Matte Blush in "Dragonfruit." 
  7. I used the Too Faced Glitter Glue with some holographic silver loose glitter on my cheeks. 
  8. Poppy has just a few outer lashes that give her eyes a girly flare, so for this I applied the Piper Ardell Adore Accent Lashes. And I tried to focus my mascara on the outer edge of my eye where I applied them. 
    • I forgot to say that I also lined my water and tight lines with a black liner just to give a little definition to my eyes with everything being so pink. 
  1. I applied some highlighter to my cupid's bow and some of the natural highlight areas. 
  2. And lastly, I used the MAC Good Luck Trolls Lipstick in "Dants off Pants Off" and the glittery pink MAC Good Luck Trolls Lipglass in "Bubble Butt."
I hope y'all enjoyed this post as much as I enjoyed the pink pores I had after removing all of this, haha!

If you have any questions, or if you recreate this look, I'd love to hear from you. I hope to do more fun and creative makeup posts in the future. 

Thanks to all of you who have been patient with me as I've slacked. I still have what feels like a million and one Portfolio pics to post from makeup I've done this year. I will get there slowly but surely. 

I hope you all have a great weekend! I'm doing some volunteer makeup this afternoon for a fashion show with proceeds which will aid domestic abuse victims. It feels good to be doing something to help those who actually need it. 

xx 
-Whitney

Sunday, October 30, 2016

Makeup Forever Ultra HD Foundation: Liquid vs. Stick

I know, I know.. I've been a huge SLACKER lately. My only excuse is that life has gotten in the way, and sidetracked me, and the only way to rectify this is to bombard my blog with a slew of posts. 

I've done a lot of makeup sessions over these last six months that I've been absent, so I am also in the process of getting those up in the Portfolio section of this site. I do vow to do so. 

To kickstart these posts, I'm going to share with you the good, the bad and the ugly on the Makeup Forever Ultra HD liquid foundation and it's counterpart, the Makeup Forever Ultra HD foundation stick. Both foundations are priced at $43, which can be a bit steep if you select the wrong one for your skin type. 

I was fortunate enough to have these sent to me by Influenster to try out and review.  

I'll start with the liquid foundation, which was ultimately my favorite of the two. 

I know that with this being the "Ultra" HD it is supposed to be the "revamped" version of the HD formula Makeup Forever originally sold. I never did try the original formula, so unfortunately, I can't compare it to this new formula. 

The liquid itself is not heavy, and seems to me to be a light to medium coverage. It is buildable, but takes a little work to cover all of the redness on my face. I do, however, like that the lighter coverage doesn't cake on my skin and seems to fill into my pores nicely. Being that it is designed to give a flawless finish and even work well in video and photography, I will say that once set with powder it looks soooo smooth. 

Onto the part that I know you want to know about most of all--the staying power.. 

As you might know from reading some of my other posts, my skin is an oil slick. However, I found that this foundation works great with my oily skin. It doesn't fall short in that department. I have yet to find any fool proof products for oily skin, so I do still use blotting sheetings throughout the day. But this foundation could easily compete with the others I have that are made to specifically combat oily skin. 

Overall, I really like this foundation. I'd definitely purchase it. Aside from having to use a little more product to get the coverage I want, I'd give it a 4 out of 5. I'd also like to point out that Makeup Forever has done a wonderful job at creating a huge variety of shades. I was fortunate that Influenster matched me up so well, but I believe there are over 30 shades to choose from. I'm planning on buying a few of this foundation for mixing to put in my MUA kit. 

Now, onto the foundation stick. 

I honestly was not impressed with it. Much like it's sister, the liquid foundation, the stick gives a beautiful finish. While the liquid is a bit more mattifying, the stick comes off super dewy and looked shiny on my skin once applied. The downside is that this is NOT a foundation for oily skin. Even with using the same setting powder, this one lasted half the time of the liquid. I also found that even when setting it didn't seem to look completely matte, which I need for my oily skin. 

It did seem, though, that the stick had a better coverage. For application I simply swipe a few stripes on each part of my face and then blend with a brush or blender sponge. The color range for the stick is just as impressive, so if you've got a more dry skin type, then I'd definitely recommend trying the stick. I think it would be perfect at making very dry skin look hydrated. 

And since I alway rate everything I review, I'm going to give the HD foundation stick a 2 out of 5. This rating is based purely off of my experience (due to my skin type). I would give it a higher rating if my skin were not so oily. But for someone who struggles with an oily t-zone as bad as mine, this foundation is basically worthless. It might last long enough to do a beat face for an Instagram picture, but that's probably the extent of it. 

I just like that it seems that Makeup Forever has made two formulas, catering to all skin types. 

Have you tried these foundations? Which works best for you? I'd love to hear what some other opinions on these products are! 

Saturday, April 23, 2016

GARNIER Micellar Cleansing Water VS. Simple Micellar Cleansing Water

For as long as I can remember, I've been searching for a makeup remover that would:
    • remove all of my makeup, because let's face it-- most products don't
    • would NOT irritate my eyes, because many of them sting 
    • would remove all of my eye makeup effortlessly
    • and would not dry out my skin
And until recently, I had yet to find a product that met all of my criteria. 

Today, though, I want to share with you my experiences using micellar waters. And I am going to give you a rundown on which I prefer. 

I've tried two drugstore ones, which are the Garnier SkinActive Micellar Cleansing Water ($6.99) as well as the Simple Micellar Cleansing Water ($4.79). 

I purchased the Simple one first, so I've used over half of that one, but I've used at least 1/3 of the Garnier one. So I finally feel that I've reached a point where I can give you some good insight. 


I'll start by talking about the GARNIER one. 

If you go to your local drugstore, Walmart or Target to purchase this micellar water, you'll find that they have two different bottles on the shelf. One with a pink lid and one with a teal lid. I purchased the teal one because the bottle stated that it removes "even waterproof mascara." I really didn't know there'd be much of a difference in formula between the two. 

What I noticed during my first few uses, is that this one equipped to remove waterproof mascara, is greasy. 

Before application, you'll shake the bottle up well, but if you'll notice in the photo on the left, you can see the oil-like substance separating at the top of the mixture. When you mix it up, it sort of disappears, but settles back at the top once you're no longer shaking it. 

The best way to use a micellar water is to saturate either a cotton ball or cotton round with it, and use those to wipe the makeup off of your face. For me, it takes a few times to get all of my makeup removed. 

For the eyes, you'll saturate one of the cotton products and then lay it on your closed eye for a few seconds before wiping the makeup away. That allows the micellar water to break down the makeup and it makes it easier to remove. This prevents you from having to scrub at your eye to get it off, thus preventing signs of premature aging.

I found that when I used this on my face, it did remove makeup well, but left a greasy film all over afterwards. I especially felt the greasiness around my eyes. Although it feels oily every time I use it, I have noticed that the better it is shaken, the less oily it seems. Sort of like using an oil based salad dressing-- if you pour it on your salad before mixing, it will be like you dumped vegetable oil all over your lettuce. But when you do shake it well, the oiliness is present, but doesn't take over the whole salad.

I've provided you a photo of the info found on the back of the bottle. You can see that their instructions for face and eye makeup removal is not unlike what I have just explained to you above. 

The directions do say to "Shake Well." I imagine this has something to do with that oily substance in this version. 

As listed above, this micellar water was around $7 for a 13.5 oz bottle. The Simple micellar water was a little under $5 for a 6.7 oz bottle. The Simple would only be a few cents pricier if we broke down the oz per dollar. But it's not large enough of a price difference to make and break buying it again. 

Another thing I'd like to mention before moving on to the Simple cleanser, is that the Garnier did NOT sting or irritate my eyes when they were saturated with it. With most all makeup remover wipes and many eye removers, my eyes sting and burn while using them to try and remove waterproof liners and mascaras. 


Now, on to the Simple micellar water.. 

One of the first things I noticed about this product was how fresh it made my skin feel. It was the first micellar water I'd tried, and it blew my expectations out of the water. 

It is gentle on the skin, doesn't leave an oily residue, removes all of my makeup, and is made by a brand that prides itself on being healthy and
"kind to skin." 

While this brand's products are often a little higher in price point than some of the other drugstore brands, I do believe that their products are good for us. 

The back packaging states that the water has multi-vitamins and skin-loving ingredients. What could be any better than that? 

The directions are much the same as the ones on the Garnier bottle. 

I found this micellar water also did NOT irritate my eyes, and that it made my skin feel good afterwards. 

I find that when I'm grabbing for one of these, I definitely pick the Simple one. Both products did remove my makeup as they stated they would. I didn't have any problems with them doing what they claim. There's nothing vastly different in the way these products work, but having my skin feeling greasy after each use is mainly what makes Garnier's product come in last place. My skin is already extremely oily in my t-zone, so I just hate using products that make it feel oily, or add unnecessary oil in. 

I do believe the oily consistency was created to help better break down waterproof and more heavy-duty makeup, but I don't think it's necessary with the Simple one excelling at removing everything without the oily concoction. 

I do plan on purchasing the one with the pink lid once I've used up this one. But either way, I'll definitely go out and buy the Simple micellar water again. 

Micellar waters are brilliant. We finally have something that will remove our makeup, won't dry out or irritate our skin, and will deep clean and help us to achiever healthier skin. Bless the chemists who sat down at the drawing board and created something like this for us, finally. 

Please leave me comments with your own experiences using micellar waters, ask questions and I'll try to answer, and let me know what you'd like to see next! 

xx 

Thursday, November 5, 2015

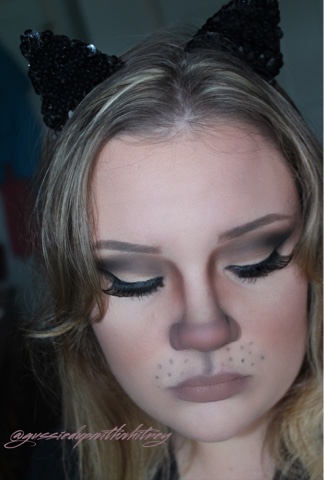
My Halloween Cat Makeup

So, for Halloween, I was first considering doing one of the ever-popular deer looks this year.. But then, I saw so many deer all over the internet that I decided to deviate away from that and do a classic cat look. 

If you look up cat makeup online, you'll see that there are many different looks out there to help you decide what kind of cat you'd like to be. I was inspired by a look I saw a fellow makeup lover do on Facebook and an Instagram photo that I'd seen recently as well. I basically used that inspiration to develop the look I wanted with my own twist. 

Like with the eyes, which I did not imitate. I just sort of started working on creating them without a clear image of what I wanted, and went with it. You'll find that when you're artistically inclined, you're very likely to start on a project, whether it be makeup or a a painting on canvas, and as you work on it it just starts to come together before your eyes. 

A lot of the shading and the added touches are instinctual. With the deep shading on either side of my nose up top, I just kept darkening that area to make it look more hollowed out, because it felt right. 

I'm so grateful to be passionate about such a powerful thing. Makeup is incredible, and what you can do with it is surreal. I've had people ask me how to know what shades go together in a palette, what type of lipstick looks good with what, how to do this or that. And the truth is, I may not be able to really explain it to you because it's all instinctual. It mostly comes to me naturally.

But the cool thing about makeup, is that there is always room for us to improve, constantly, because it is an art form. So if you're not where you want to be, then just keep at whatever it is you're wanting to improve. 

Also, I'd like to point out that I made the ears you see me wearing in these photos. I actually cut ear shapes out of cardboard, hot glued a sequence ribbon to the cardboard ears, and then hot glued the ears to a headband. It was super easy! 

The thing I really enjoyed about this cat look aside from the opportunity to be creative with makeup, was that it was very cost affordable! 

If you're looking to be something simple but sensual and fun, then try a cat for next Halloween!  

xx 

Tuesday, October 27, 2015

LUSH Cupcake Fresh Face Mask *Review*

This Cupcake Fresh Face Mask ($7.95) is the first Lush "fresh face" product I've tried. I was lucky enough to purchase it during a mother-daughter outing a few weekends back since we don't have a Lush store near my hometown. 

I went into the store (which was only my second time in a Lush store) pretty dumb about the term fresh face. I didn't even realize that the "fresh face" line was refrigerated, or that it being made with all "fresh" ingredients meant that the expiration was only roughly a month past the purchase date. I'd previously scoured the website and wrote down every product they had that I was interested in trying. I knew I could only get this particular product in stores, but assumed it was just because it was "fresh." Haha.

Lame, I know.


The product by-line states that it was "invented with the teenage skin in mind." And while I'm obviously not a teenager, the mask is said to be good for oily or spotty skin, both of which I suffer from. I have redness/splotchiness and an EXTREMELY oily t-zone. 

The first thing I noticed about the mask was the smell. The chocolatey-minty scent is not unpleasant, but also doesn't smell like a York Peppermint Patty or an Andes Mint. Even though the mask formula is predominately Rhassoul mud for a deep cleanse, there is also spearmint oil for cooling purposes and vanilla absolute for redness. 
When I applied it to my face it was relatively thick, so I spread it as thinly as possible for the first use. I also feel that if you use a thinner coat as I did in my photo on the right, then you'll be able to get a few extra applications out of the tub. 

Another thing I noticed about the mask is that when it dries, if you leave it on for too long, it starts to crumble off your face and can be a bit messy. I actually ended up with a bunch of it dropped all over my shirt the first time I used it. But that's not something that can't be prevented as long as you remove it with a warm washcloth before it gets too dried out on your face. 

The mask itself feels slightly cooling from the spearmint oil, but doesn't burn or tingle like some masks I've used. It actually feels nice. And when it dries, you get the standard tight feeling as per usual with a face mask. 

Overall, I like this mask. I obviously won't be getting it all the time since I don't live close by to a Lush Cosmetics store. But I feel that the mask is definitely worth $7.95, which seems affordable in comparison to some of their other products. 

I also like that the ingredients are fresh and safe for my skin, but there is a downside of that, being that the product has a short shelf life. 

Overall, I am going to give this mask a B. While it seems like a good mask, I hate that there are probably only about five applications worth in the tub. And I also hate that I have to rush to use it so it doesn't expire. The smell is okay, but not the greatest, either. 

Would I purchase it again? Probably, if it were more easily accessible for us small town folk! I'm not sure that it's altered my oily skin in any way from my two uses, but just knowing that it is good for oily and splotchy red skin is enough for me. 

Let me know what you all think of this product if you've tried it, if you have any questions, comments, or requests, and also maybe advise me on some other Lush products I might like! 

xx 

Wednesday, October 7, 2015

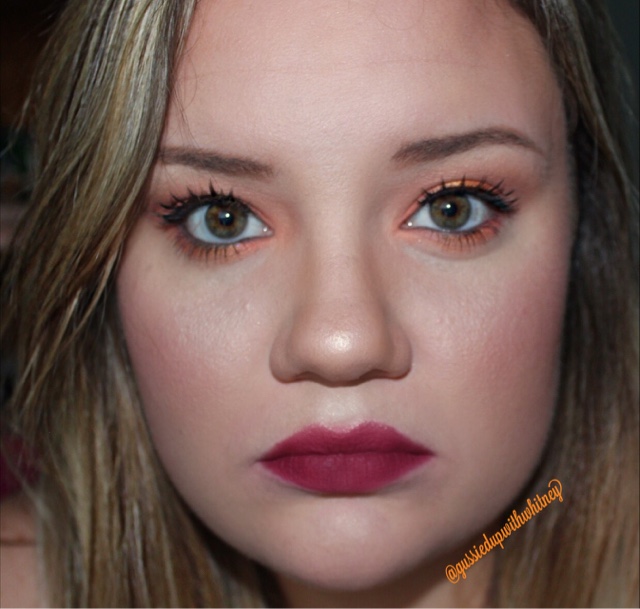
Coral & Orange Fall Makeup

For this look, I used the Jaclyn Hill Favorite's Palette from Morphe Brushes, which is no longer available, unfortunately. I created this vibrant fall look as something "outside the norm" of my usual everyday makeup, and I LOVED how it turned out. 

I decided to pair it with one of my favorite berry lip shades, MAC "Riri Heaux." I believe you can order the permanent "Heaux" lipstick on their website, which should match it. But this particular one was limited edition. 

Let me know if you all have any questions, comments or requests for me! 

Friday, September 18, 2015

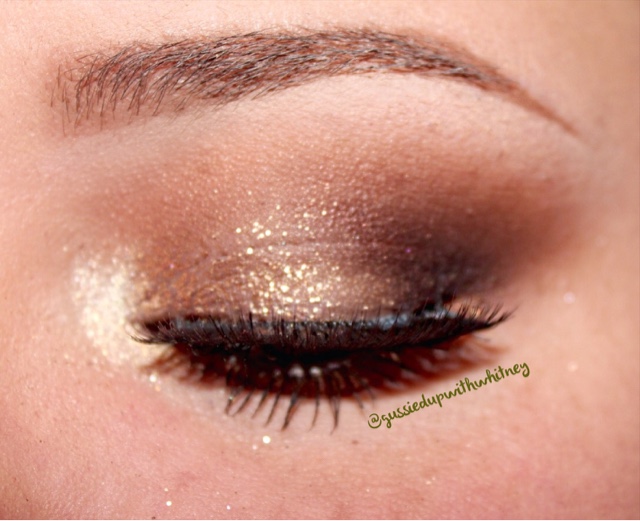
Glitter & Gold Eye Look

So, I meant to have this one up a few days ago because I got such positive feedback for it on my Instagram and Facebook, but life got in the way (and it does sometimes). 

Basically, just like my previous post said, I used the Lorac Mega Pro from last year's holiday season, because I haven't used it quite enough since purchasing it and it's such a beautiful and versatile palette. People basically raved for weeks about how Lorac Cosmetics sucked if he/she didn't get one because the quantity was so limited. I camped out like a total fan girl, so I was fortunate enough to get mine. 

I'm just going to hop right into it, so I don't have to ramble anymore than absolutely necessary. 

1. So, naturally I had already filled in my bows with my ABH Dip Brow "Caramel" ($18) and primed my eyes. So for the first step in the photo, you'll see that I am applying a transition shade (which I usually always do first). I used the shade "Camel," which is a nice tan brown shade to buff out the crease and diffuse the darker colors we'll be applying later on. 
  
2. I used this gold crayon I got from, I believe, an Ipsy bag and it is by TreStique in the shade "Venetian Gold." You can also use a gold MAC Paint Pot, a NYX Jumbo Eye Pencil, or even a Maybelline Eye Tattoo. Just use what you have. But my purpose for prepping my lid with this is to give us a nice base to apply our gold shadow and make it stand out more. 
3. I think I missed a step with my photos, so I'll just explain to you what I did next: 
  • I packed the shade "Copper" onto the inner portion of my lid with a shader brush and "Sienna to the outer part. 
  • And then started to blend out the outer edge with the shadow "Sienna," taking that further into my crease. 
I also chose to deepen up the outer "V" of my eye with the deep brown, matte shade "Espresso." This just gives more dimension to the look. 
4. I then packed on some gold glitter from a previous MAC holiday collection, so I don't believe it's available now. I need to get some actual glitter glue, but this time I used my finger to apply a drop of Makeup Forever Aqua Seal ($21) to my lid and then tapped the glitter onto that inner half where the gold shadow is concentrated.
5. I wanted this look to still be pretty bright, so I used a pencil type brush and my MAC Fix+ to apply the gold "Copper" color to the bottom lash line. And I used my finger to tap a bit of the shade "Opal" onto the inner corner of my eye. 
6. For the last major step, I defined the eye a little more by applying a brown pencil liner to my water line and tight line. And after applying a quick coat of mascara, I put applied some dramatic lashes to finish off the look. 
I really hope you all like this look as much as I enjoyed putting it together! I wish I'd had a better glitter glue product, so I could have packed it on more dramatic, but I guess I'll know to get some for next time. 

Let me know if you all have any questions, comments, suggestions, etc. 

Tuesday, September 15, 2015

Peach & Plum Fall Eye Look

I wanted something simple and everyday that resembled the beautiful fall leaves we will be seeing in a few weeks time. 

I haven't used my Lorac Mega Pro quite as much as I should have over the past year, so it felt like the perfect time to get it out and take it for a spin. 

1. I started out with the pale tan shade "Fawn" as my transition shade. It hardly showed up at all, but I wasn't something light and very natural since this was supposed to be an everyday look.

2. I then applied the NYX Jumbo Eye Pencil in "Milk" to my lid, which I only used to brighten up the lid and make the lid shadow stand out a little better.


3. Then, I packed the shade "Apricot" all over my lid. **Try not to bring it up above the lid, though.** 
4. I then took the shade "Mulberry" and applied it to the outer "V" of my eye, just slowly and deliberately blended it out and into the inner half of my crease until it was as soft as I wanted. 

And to deepen it up a little more, I used the shade "Granite," but made sure not to lose the overall purplish tint on the eye. 

I should also point out that I went back in with the transition shade as well to smooth out the area closer to my brow bone. 

5. For the bottom lash line, I simply applied "Mulberry" along the outer half of my eye and "Apricot" to the inner half. 

And I swiped a bit of "Opal" on the inner corner to open up the eye a bit more.


6. Lastly, I lined my waterline with the discontinued UD 24/7 Glide-On Eye Pencil in "Lucky," which is just a rich copper shade. And then applied two coats of mascara. 

And there it is.. the finished look! I hope you all enjoy this one as much as I did. I think it's something that would look great with any eye shade, is perfect for the upcoming fall season, and can be worn day or night!  If you wanted a smokier look, you could do top liner, and deepen up the outer edge and underneath the eyes more. 
As always, let me know if you have any ideas, suggestions, comments or thoughts. I love getting feedback! x 


Thursday, September 10, 2015

Versatile Black Smoky Eye feat. Kat Von D Shade + Light Eye Contour Palette

Since posting this look last week on my various social media outlets, I've had quite a bit of interest on how I created it! I LOVE sharing my work and giving tips and how-to's for those of you with an avid interest in learning more about makeup or recreating what I've come up with. 

I don't have photos for this particular look as I have for some of the others I've posted recently, because I attempted to video myself doing this look and it didn't turn out as well as I'd hoped. For now, I'm going to stick to the photos, but I am trying to learn how to edit and produce better quality videos with my DSLR camera. 
Below, I've posted a photo of the Kat Von D Shade + Light Eye Contour Palette ($46) to show which shades I used for each step in this look. If you do not have this palette, you can use similar shades from other palettes you may have. Also, you can use shimmer shadows, but this particular palette is completely matte. I didn't choose to add any glitter or shimmer to my eyes. 
  1. I first set my eye primer with the cream shade marked as the "brow bone highlight" above. 
  2. I then used the creamsicle looking "transition shade" to carve out the entire crease and set a nice base above the crease, so when I used the darker shades it would be easier to blend and smooth out. 
  3. Next, I applied a coat of the Maybelline Eye Studio Color Tattoo in "Dramatic Black" ($6.99) just to my lid. You could also use a black eyeliner, a jumbo eye pencil, etc. I did this so that when I did apply the black shadow it would be much deeper and bolder on the lid. 
  4. The obvious next step is to take a flat shader brush (or your finger, since I find that I often get super intense pigmentation when I use my finger to pat it on) to pack the matte black shadow across my entire lid. 
    • Try not to apply the black much above the lid. We'll be blending the black out with lighter colors next, so keep the black strictly to the lid. 
  5. I then mixed the two "crease" shades above and started to blend those into the crease all across the eye. 
    • It takes a lot of patience when using a dark shade on the lid, so just keep blending and adding more of those shadows to your brush until the black and warm browns start to meld together and look smooth on your eye. 
    • Also, when blending these browns into the crease, try not to carry them up too close to your brow bone. You want that original pale orange shade to continue on as your transition shade, so the shadows all fade out closer to the brow you get.
  6. Then, I took a fluffy blending brush and reapplied that "transition shade" to that area right under the brow bone to further blend and accentuate that transition. 
  7. I also usually reapply the "brow bone highlight" shade to the area below my brows. By doing so, you're brightening up the upper area of the eye and it also helps to define your brows and enlarge your eyes. 
  8. Since this was a black smoky look, I didn't feel it necessary to use a liner up top. I used a black kohl pencil liner to line my waterline and tightline. 
  9. I also used the warmer brown "crease" shade on the right side of the palette with a small pencil brush to go across the whole bottom lash line. And topped that off with a thin line of the black shadow to smoke it out but add dimension. 
    • If you look at any of the open-eyed photos in this post, you can see the warm brown and black both on my bottom lash line. The brown shade just brings a little warmth back to the eyes. 
  10. I curled my lashes and applied a thin coat of mascara to them. Then, I applied the Salon Perfect 614 Black Strip Lash lashes. 
I also had a few people ask me about my lip combination for this look, which included the NYX Slim Lip Pencil "Nutmeg" ($3.50) and Gerard Cosmetics Lipstick in "Nude" ($19). I chose to do with a more neutral colored lip, which wouldn't take away from the smoky eye I created. 
And there you have it, folks! Let me know if you have any questions, suggestions for the future, or comments! 

I hope to do something fun next. Maybe with some wild colors involved?! I'm not sure yet, but I'm already excited to share it with you all! x