So, I meant to have this one up a few days ago because I got such positive feedback for it on my Instagram and Facebook, but life got in the way (and it does sometimes).
Basically, just like my previous post said, I used the Lorac Mega Pro from last year's holiday season, because I haven't used it quite enough since purchasing it and it's such a beautiful and versatile palette. People basically raved for weeks about how Lorac Cosmetics sucked if he/she didn't get one because the quantity was so limited. I camped out like a total fan girl, so I was fortunate enough to get mine.
I'm just going to hop right into it, so I don't have to ramble anymore than absolutely necessary.
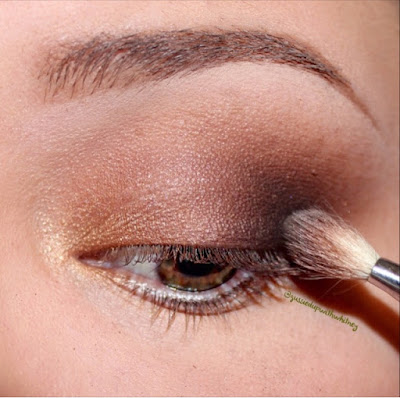
1. So, naturally I had already filled in my bows with my ABH Dip Brow "Caramel" ($18) and primed my eyes. So for the first step in the photo, you'll see that I am applying a transition shade (which I usually always do first). I used the shade "Camel," which is a nice tan brown shade to buff out the crease and diffuse the darker colors we'll be applying later on.
2. I used this gold crayon I got from, I believe, an Ipsy bag and it is by TreStique in the shade "Venetian Gold." You can also use a gold MAC Paint Pot, a NYX Jumbo Eye Pencil, or even a Maybelline Eye Tattoo. Just use what you have. But my purpose for prepping my lid with this is to give us a nice base to apply our gold shadow and make it stand out more.
3. I think I missed a step with my photos, so I'll just explain to you what I did next:
- I packed the shade "Copper" onto the inner portion of my lid with a shader brush and "Sienna to the outer part.
- And then started to blend out the outer edge with the shadow "Sienna," taking that further into my crease.
4. I then packed on some gold glitter from a previous MAC holiday collection, so I don't believe it's available now. I need to get some actual glitter glue, but this time I used my finger to apply a drop of Makeup Forever Aqua Seal ($21) to my lid and then tapped the glitter onto that inner half where the gold shadow is concentrated.

5. I wanted this look to still be pretty bright, so I used a pencil type brush and my MAC Fix+ to apply the gold "Copper" color to the bottom lash line. And I used my finger to tap a bit of the shade "Opal" onto the inner corner of my eye.
6. For the last major step, I defined the eye a little more by applying a brown pencil liner to my water line and tight line. And after applying a quick coat of mascara, I put applied some dramatic lashes to finish off the look.
I really hope you all like this look as much as I enjoyed putting it together! I wish I'd had a better glitter glue product, so I could have packed it on more dramatic, but I guess I'll know to get some for next time.
Let me know if you all have any questions, comments, suggestions, etc.


This makeup looks beautiful! I love the gold shadow :)
ReplyDeleteSarah | Moved to: What Sarah Writes
Thank you, Sarah! I love gold, too!!
Delete