Showing posts with label lorac mega pro. Show all posts

Monday, October 12, 2015

Wedding Party Makeup 10/10/2015

On Saturday, I did makeup for an old friend and her sister for their older sister's "big day." We had so much fun, and they're both so pretty that it made my job easy. I love working with people I know and feel comfortable with. 

Since this was for their sister's wedding, I tried to give each of them a toned down glam look. I used the Lorac Mega Pro (no longer available) and Lorac Pro 2 ($42) for their eyes. 

I tried to stick to a dewy and fresh look for Tori's face makeup. She has the perfect features for contouring and highlighting. 

Also, with her eyes, I did a champagne, rose gold and grey look to emphasize the blue of her eyes. The wedding's colors were chocolate brown and coral. 

I used the MAC Fluidline ($16.50) in "Blacktrack" for her top liner and I also applied it to the waterline. 


Girlfriend has such awesome brows and long lashes that neither needed much work. I did minimal filling in on the brows, and we used a few coats of waterproof mascara to protect her eyes just in case she got teary during the wedding ceremony. 

For Tori's natural lip, I used the NYX Slim Lip Pencil ($3.49) in "Mauve," which is the perfect natural shade to enhance the natural pink tint of the lips. 

Campbell is in seventh grade, so I didn't want overdo it on her makeup. I chose a natural champagne eye look and topped it off with MAC Fluidline ($16.50) in the shade "Dipdown" for her winged liner, which she requested. I chose the brown shade versus black because I didn't want her eyes to look too heavy or dark, and the brown offered a slight smoky appearance without being too much for her age. 

I used a bronzy shade on her bottom lash line, which accentuated her blue eyes and added a pop of color. 

Lastly, I used a natural pink lipstick on her lips to give them some color and shine without being too dramatic. 

While this look is appropriate for her age, I also feel that it would look great on everyone. I did not contour her face, but did some slight strobing on her cheeks and nose to give her a soft glow. 

Friday, September 18, 2015

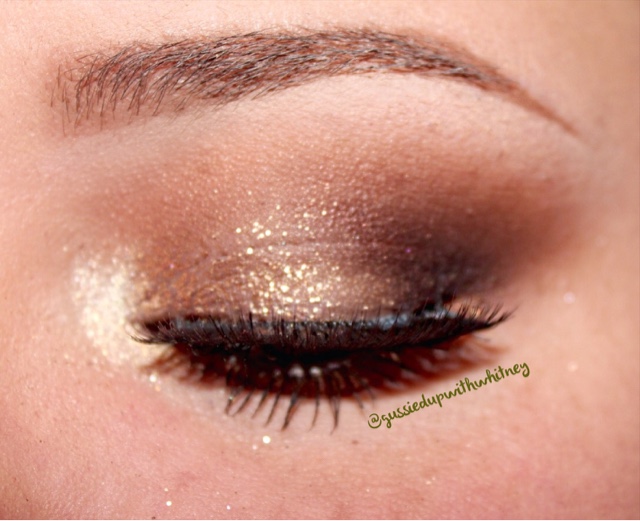
Glitter & Gold Eye Look

So, I meant to have this one up a few days ago because I got such positive feedback for it on my Instagram and Facebook, but life got in the way (and it does sometimes). 

Basically, just like my previous post said, I used the Lorac Mega Pro from last year's holiday season, because I haven't used it quite enough since purchasing it and it's such a beautiful and versatile palette. People basically raved for weeks about how Lorac Cosmetics sucked if he/she didn't get one because the quantity was so limited. I camped out like a total fan girl, so I was fortunate enough to get mine. 

I'm just going to hop right into it, so I don't have to ramble anymore than absolutely necessary. 

1. So, naturally I had already filled in my bows with my ABH Dip Brow "Caramel" ($18) and primed my eyes. So for the first step in the photo, you'll see that I am applying a transition shade (which I usually always do first). I used the shade "Camel," which is a nice tan brown shade to buff out the crease and diffuse the darker colors we'll be applying later on. 
  
2. I used this gold crayon I got from, I believe, an Ipsy bag and it is by TreStique in the shade "Venetian Gold." You can also use a gold MAC Paint Pot, a NYX Jumbo Eye Pencil, or even a Maybelline Eye Tattoo. Just use what you have. But my purpose for prepping my lid with this is to give us a nice base to apply our gold shadow and make it stand out more. 
3. I think I missed a step with my photos, so I'll just explain to you what I did next: 
  • I packed the shade "Copper" onto the inner portion of my lid with a shader brush and "Sienna to the outer part. 
  • And then started to blend out the outer edge with the shadow "Sienna," taking that further into my crease. 
I also chose to deepen up the outer "V" of my eye with the deep brown, matte shade "Espresso." This just gives more dimension to the look. 
4. I then packed on some gold glitter from a previous MAC holiday collection, so I don't believe it's available now. I need to get some actual glitter glue, but this time I used my finger to apply a drop of Makeup Forever Aqua Seal ($21) to my lid and then tapped the glitter onto that inner half where the gold shadow is concentrated.
5. I wanted this look to still be pretty bright, so I used a pencil type brush and my MAC Fix+ to apply the gold "Copper" color to the bottom lash line. And I used my finger to tap a bit of the shade "Opal" onto the inner corner of my eye. 
6. For the last major step, I defined the eye a little more by applying a brown pencil liner to my water line and tight line. And after applying a quick coat of mascara, I put applied some dramatic lashes to finish off the look. 
I really hope you all like this look as much as I enjoyed putting it together! I wish I'd had a better glitter glue product, so I could have packed it on more dramatic, but I guess I'll know to get some for next time. 

Let me know if you all have any questions, comments, suggestions, etc. 

Tuesday, September 15, 2015

Peach & Plum Fall Eye Look

I wanted something simple and everyday that resembled the beautiful fall leaves we will be seeing in a few weeks time. 

I haven't used my Lorac Mega Pro quite as much as I should have over the past year, so it felt like the perfect time to get it out and take it for a spin. 

1. I started out with the pale tan shade "Fawn" as my transition shade. It hardly showed up at all, but I wasn't something light and very natural since this was supposed to be an everyday look.

2. I then applied the NYX Jumbo Eye Pencil in "Milk" to my lid, which I only used to brighten up the lid and make the lid shadow stand out a little better.


3. Then, I packed the shade "Apricot" all over my lid. **Try not to bring it up above the lid, though.** 
4. I then took the shade "Mulberry" and applied it to the outer "V" of my eye, just slowly and deliberately blended it out and into the inner half of my crease until it was as soft as I wanted. 

And to deepen it up a little more, I used the shade "Granite," but made sure not to lose the overall purplish tint on the eye. 

I should also point out that I went back in with the transition shade as well to smooth out the area closer to my brow bone. 

5. For the bottom lash line, I simply applied "Mulberry" along the outer half of my eye and "Apricot" to the inner half. 

And I swiped a bit of "Opal" on the inner corner to open up the eye a bit more.


6. Lastly, I lined my waterline with the discontinued UD 24/7 Glide-On Eye Pencil in "Lucky," which is just a rich copper shade. And then applied two coats of mascara. 

And there it is.. the finished look! I hope you all enjoy this one as much as I did. I think it's something that would look great with any eye shade, is perfect for the upcoming fall season, and can be worn day or night!  If you wanted a smokier look, you could do top liner, and deepen up the outer edge and underneath the eyes more. 
As always, let me know if you have any ideas, suggestions, comments or thoughts. I love getting feedback! x