Showing posts with label hazel eyes. Show all posts

Thursday, November 5, 2015

My Halloween Cat Makeup

So, for Halloween, I was first considering doing one of the ever-popular deer looks this year.. But then, I saw so many deer all over the internet that I decided to deviate away from that and do a classic cat look. 

If you look up cat makeup online, you'll see that there are many different looks out there to help you decide what kind of cat you'd like to be. I was inspired by a look I saw a fellow makeup lover do on Facebook and an Instagram photo that I'd seen recently as well. I basically used that inspiration to develop the look I wanted with my own twist. 
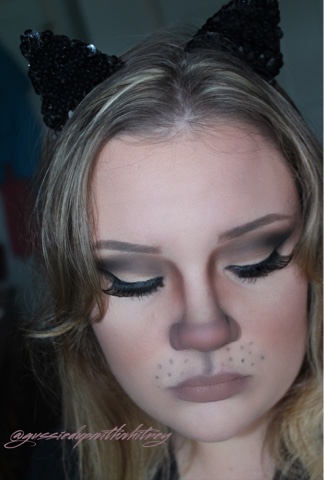
Like with the eyes, which I did not imitate. I just sort of started working on creating them without a clear image of what I wanted, and went with it. You'll find that when you're artistically inclined, you're very likely to start on a project, whether it be makeup or a a painting on canvas, and as you work on it it just starts to come together before your eyes. 

A lot of the shading and the added touches are instinctual. With the deep shading on either side of my nose up top, I just kept darkening that area to make it look more hollowed out, because it felt right. 

I'm so grateful to be passionate about such a powerful thing. Makeup is incredible, and what you can do with it is surreal. I've had people ask me how to know what shades go together in a palette, what type of lipstick looks good with what, how to do this or that. And the truth is, I may not be able to really explain it to you because it's all instinctual. It mostly comes to me naturally.

But the cool thing about makeup, is that there is always room for us to improve, constantly, because it is an art form. So if you're not where you want to be, then just keep at whatever it is you're wanting to improve. 

Also, I'd like to point out that I made the ears you see me wearing in these photos. I actually cut ear shapes out of cardboard, hot glued a sequence ribbon to the cardboard ears, and then hot glued the ears to a headband. It was super easy! 

The thing I really enjoyed about this cat look aside from the opportunity to be creative with makeup, was that it was very cost affordable! 

If you're looking to be something simple but sensual and fun, then try a cat for next Halloween!  

xx 

Tuesday, November 3, 2015

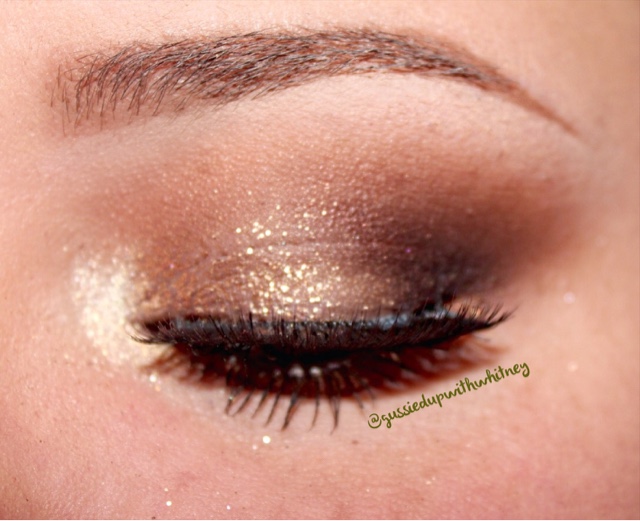
Fall Smoky Eye Client Session

Okay, so this pretty lady just wanted to have her makeup done for a mother-son night out with her precious baby. She asked for something smoky, let me do what I wanted, and this is what I came up with. 

I predominately used shadows from the Naked Palettes, which I know many of you have. Even girls who know little about makeup know that the Naked palettes are cult favorites. They're very versatile and go well with all skin tones and eye shades. 

I used browns and gold and black on her eyes, which are hazel and very similar to my own. 
For her lips, I used a nice fall, neutral shade to complement and not overpower her smoky eyes. 

I loved working with Jessie. She is very admirable. A young mom who works hard to provide for her baby boy. Sometimes us women just deserve to pamper ourselves from time-to-time! 

Leave any remarks, suggestions, requests, etc. in the comments. 

I have a few more posts to get up today, so stay tuned! 

xx 

Friday, September 18, 2015

Glitter & Gold Eye Look

So, I meant to have this one up a few days ago because I got such positive feedback for it on my Instagram and Facebook, but life got in the way (and it does sometimes). 

Basically, just like my previous post said, I used the Lorac Mega Pro from last year's holiday season, because I haven't used it quite enough since purchasing it and it's such a beautiful and versatile palette. People basically raved for weeks about how Lorac Cosmetics sucked if he/she didn't get one because the quantity was so limited. I camped out like a total fan girl, so I was fortunate enough to get mine. 

I'm just going to hop right into it, so I don't have to ramble anymore than absolutely necessary. 

1. So, naturally I had already filled in my bows with my ABH Dip Brow "Caramel" ($18) and primed my eyes. So for the first step in the photo, you'll see that I am applying a transition shade (which I usually always do first). I used the shade "Camel," which is a nice tan brown shade to buff out the crease and diffuse the darker colors we'll be applying later on. 
  
2. I used this gold crayon I got from, I believe, an Ipsy bag and it is by TreStique in the shade "Venetian Gold." You can also use a gold MAC Paint Pot, a NYX Jumbo Eye Pencil, or even a Maybelline Eye Tattoo. Just use what you have. But my purpose for prepping my lid with this is to give us a nice base to apply our gold shadow and make it stand out more. 
3. I think I missed a step with my photos, so I'll just explain to you what I did next: 
  • I packed the shade "Copper" onto the inner portion of my lid with a shader brush and "Sienna to the outer part. 
  • And then started to blend out the outer edge with the shadow "Sienna," taking that further into my crease. 
I also chose to deepen up the outer "V" of my eye with the deep brown, matte shade "Espresso." This just gives more dimension to the look. 
4. I then packed on some gold glitter from a previous MAC holiday collection, so I don't believe it's available now. I need to get some actual glitter glue, but this time I used my finger to apply a drop of Makeup Forever Aqua Seal ($21) to my lid and then tapped the glitter onto that inner half where the gold shadow is concentrated.
5. I wanted this look to still be pretty bright, so I used a pencil type brush and my MAC Fix+ to apply the gold "Copper" color to the bottom lash line. And I used my finger to tap a bit of the shade "Opal" onto the inner corner of my eye. 
6. For the last major step, I defined the eye a little more by applying a brown pencil liner to my water line and tight line. And after applying a quick coat of mascara, I put applied some dramatic lashes to finish off the look. 
I really hope you all like this look as much as I enjoyed putting it together! I wish I'd had a better glitter glue product, so I could have packed it on more dramatic, but I guess I'll know to get some for next time. 

Let me know if you all have any questions, comments, suggestions, etc. 

Thursday, September 10, 2015

Versatile Black Smoky Eye feat. Kat Von D Shade + Light Eye Contour Palette

Since posting this look last week on my various social media outlets, I've had quite a bit of interest on how I created it! I LOVE sharing my work and giving tips and how-to's for those of you with an avid interest in learning more about makeup or recreating what I've come up with. 

I don't have photos for this particular look as I have for some of the others I've posted recently, because I attempted to video myself doing this look and it didn't turn out as well as I'd hoped. For now, I'm going to stick to the photos, but I am trying to learn how to edit and produce better quality videos with my DSLR camera. 
Below, I've posted a photo of the Kat Von D Shade + Light Eye Contour Palette ($46) to show which shades I used for each step in this look. If you do not have this palette, you can use similar shades from other palettes you may have. Also, you can use shimmer shadows, but this particular palette is completely matte. I didn't choose to add any glitter or shimmer to my eyes. 
  1. I first set my eye primer with the cream shade marked as the "brow bone highlight" above. 
  2. I then used the creamsicle looking "transition shade" to carve out the entire crease and set a nice base above the crease, so when I used the darker shades it would be easier to blend and smooth out. 
  3. Next, I applied a coat of the Maybelline Eye Studio Color Tattoo in "Dramatic Black" ($6.99) just to my lid. You could also use a black eyeliner, a jumbo eye pencil, etc. I did this so that when I did apply the black shadow it would be much deeper and bolder on the lid. 
  4. The obvious next step is to take a flat shader brush (or your finger, since I find that I often get super intense pigmentation when I use my finger to pat it on) to pack the matte black shadow across my entire lid. 
    • Try not to apply the black much above the lid. We'll be blending the black out with lighter colors next, so keep the black strictly to the lid. 
  5. I then mixed the two "crease" shades above and started to blend those into the crease all across the eye. 
    • It takes a lot of patience when using a dark shade on the lid, so just keep blending and adding more of those shadows to your brush until the black and warm browns start to meld together and look smooth on your eye. 
    • Also, when blending these browns into the crease, try not to carry them up too close to your brow bone. You want that original pale orange shade to continue on as your transition shade, so the shadows all fade out closer to the brow you get.
  6. Then, I took a fluffy blending brush and reapplied that "transition shade" to that area right under the brow bone to further blend and accentuate that transition. 
  7. I also usually reapply the "brow bone highlight" shade to the area below my brows. By doing so, you're brightening up the upper area of the eye and it also helps to define your brows and enlarge your eyes. 
  8. Since this was a black smoky look, I didn't feel it necessary to use a liner up top. I used a black kohl pencil liner to line my waterline and tightline. 
  9. I also used the warmer brown "crease" shade on the right side of the palette with a small pencil brush to go across the whole bottom lash line. And topped that off with a thin line of the black shadow to smoke it out but add dimension. 
    • If you look at any of the open-eyed photos in this post, you can see the warm brown and black both on my bottom lash line. The brown shade just brings a little warmth back to the eyes. 
  10. I curled my lashes and applied a thin coat of mascara to them. Then, I applied the Salon Perfect 614 Black Strip Lash lashes. 
I also had a few people ask me about my lip combination for this look, which included the NYX Slim Lip Pencil "Nutmeg" ($3.50) and Gerard Cosmetics Lipstick in "Nude" ($19). I chose to do with a more neutral colored lip, which wouldn't take away from the smoky eye I created. 
And there you have it, folks! Let me know if you have any questions, suggestions for the future, or comments! 

I hope to do something fun next. Maybe with some wild colors involved?! I'm not sure yet, but I'm already excited to share it with you all! x 

Sunday, August 16, 2015

UD Naked Smoky Eye "Stroke of Gold at Midnight" Look

I've decided to do a mini series of eye looks with the *NEW* Urban Decay Naked Smoky Eyeshadow Palette ($54) while the new addition to the cult classic set is still "all the rage." 

Today, I went with what I am calling a "Stroke of Gold at Midnight" because I used a midnight purplish shade called "Smolder" along with the gold shade from the palette, "Dirtysweet." I wanted something obviously smoky-- hence the palette name, yet something that could be toned down with a more thorough blend, or made much more intense if desired. 

I chose not to wear any false lashes today. I'm not a huge fan of them. They do seem to take an eye look from "everyday" to "glam," but they aren't a must have for every makeup look. I don't think this eye look is any less beautiful without falsies.

Without further ado, let's get started. I'll be giving step-by-step instructions on exactly how I achieved this eye look. I hope you enjoy! And remember, feel free to make suggestions, ask questions, or let me know what you'd like to see next! 
1. First, I primed my eye with the MICA Beauty Cosmetics Eye Primer ($44.95), set everything with the matte white shadow "Thirteen" and then used my NYX Wonder Pencil in "Light" ($4.49) to define the brow area. 

I then took a flat, rounded packing brush to blend and soften the white under the brow bone from the pencil. 
  • I should also say that I used a piece of clear tape along the outer edge of my lid to get a nice defined line for my makeup when it's finished. Make sure you first lightly stick it to your hand before applying to your eye area, as that will prevent the tape from removing your face makeup when you take it off at the end. 
2. Next, I used a fluffy Sigma blending brush to buff the matte, pinky flesh shade "Combust" onto the area above my lid to act as my transition. (I'm also not sure why my pupil looks extremely dilated in this photo, but no, I was not on drugs!) 
  • This shade is a bit more cool-toned than my actual skin tone and is fair enough to blend seamlessly for transition purposes. 
3. I used another flat lid brush (as seen in the photo below) with some MAC Prep + Prime Fix + ($22) to pack the gold shade "Dirtysweet" onto the center third of my eye. 
  • If it looks a bit messy, don't worry! We will be doing a heck of a lot of blending to get the shadows smoothed out how we want them! 
4. Next, I used the midnight purplish-black shade (or that's how I see it in the palette) "Smolder" and applied it to the inner and out parts of my lid on either side of where I applied the gold. 
  • I packed on several coats of it to get it to the darkness/intensity that I was happy with. This part is totally up to you. You can choose how deep you want it. 
  • If I lost any of the gold pigmentation, I used my finger to dip into the gold and pat it directly on top of the gold area to brighten it up. 
5. Then, I used the matte grey shadow "Password" with a MAC 217 brush to buff and blend out the shadows along the crease. 
  • NOTE: It did take me several fresh dips into the password shade and excessive blending to get the shadows soft enough to look seamless and smooth. Do not be afraid to add more if you have to to get the shades blended out enough. The key to any successful eye look is to blend, blend, and blend some more! 
6. I then used my NYC Liquid Liner in "Pearlized Black" ($2.77) to line my upper lash line and wing out my liner. 
7. As I stated at the beginning of this post, I chose not to use falsies. But I did apply two coats of the Too Faced "Better Than Sex" Mascara ($23)to my lashes. 

I lined my bottom lash line with the gold shade "Dirtysweet." And I also used the Too Faced Perfect Eyes Water Proof Eyeliner in "Perfect Black" ($18) to line my water line and tight line. 
And there it is! My finished look in all of it's splendor. It's very versatile, will look good on any eye color/skin tone, and can be worn anytime, day or night!

xx 

Saturday, July 25, 2015

Neutral Glam featuring Makeup Geek & "1995" Lipstick

Even though I was on a time crunch for completing this look, it turned out pretty good! Actually, I was aiming to use a different lip shade, but pulled this one out mistakenly and it ended up working out really well. 

I wasn't really inspired to do anything in particular, but recently started my Makeup Geek shadow collection and had an inkling to experiment with them. 

I will say, though, that I was impressed with the Makeup Geek shadows. I will have to add more of them to my collection and play around more to develop a good enough opinion to report back, but I do believe that the Coastal Scents Hot Pots are just as good as Makeup Geek and even MAC shadows. 

I have had a decent amount of experience with MAC shadows and a ton of pleasant experiences with the hot pots. They're all so pigmented. I haven't found one hot pot that I dislike, which is a big deal for any company! 

I chose to apply some smaller and more natural lashes for this look. It enhanced the eyes enough to take the look from "everyday" to "glam," in my opinion. 

I am, however, still not completely happy with my brows. I feel like even though I frequently pluck and trim them, they are still not as polished as I'd like once filled in. I have seen progress with them in the last year or so, but they still need help. I will be the first to admit, that while I do love makeup, there is still so much for me to learn, and my brows are a work in progress. 

I do like using the Micro Brow Pencil from NYX, which is the first brow pencil I've found to truly look good with my brow shade. I have ashy looking brows that are rarer and are harder to find good products to match. The NYX pencil mimics the ABH Brow Wiz, but I've found that the latter is a little too dark fro my liking. This one just looks so much more natural and is a good match for me. 

I hate that I was unable to get a good eyes closed shot this time! I was in a hurry to go target shooting with my dad, so I was just aimlessly snapping my makeup photos at last minute. This one shows you that I had sort of a champagne-pink-burnt orange look going on. Those shades are just so awesome for green or hazel eyes. 

Overall, I tried to keep the face smooth and slightly dewy. I don't like it to be too overly dewy since my t-zone is EXTREMELY oily, but I try to find a balance. 

This look is okay for summer, but would be beautiful for fall! Honestly, you could probably pull off these colors just about anytime. 

Down below I'll be listing my products as per usual. If you have any questions, comments or experiences you'd like to share, feel free! 

Products Used: 
Face Primer: MAC Prep + Prime Skin Refined Zone for t-zone  $22 & Maybelline Face Studio Master Prime Blur + Smooth Primer  for rest of the face  $9.99 
Eye Primer: Mica Beauty Eye Primer  $44.95
Foundation: Kat Von D Lock-it Tattoo in "Light 45" 
Concealer: Maybelline Fit Me "Fair"  $6.99
Setting Powder (mostly for t-zone): Coty Airspun Loose Face Powder in "Translucent Extra Coverage"  $7

Pressed Powder (all over): MAC Mineralize Skinfinish Natural in "Medium"  $32
Highlight: MAC Mineralize Skinfinish in "Soft and Gentle"  $32
Eyeshadow: 
Liner: MAC Fluidline "Dipdown"  $16
Brows: NYX Cosmetics Micro Brow Pencil in "Taupe"  $9.99
Brow Highlighting Pencil: NYX Cosmetics Wonder Pencil "Light"  $4.49
Lashes: (will look up when I get a chance) 

I hope you find this post helpful! Let me know if you have any questions, comments or suggestions for future looks! x